

Home | Contact Us | Submit Troubleshooting Info | Search | Help
Output | Software Solutions | Proofing | Color, Screening and Calibration | Scanning | Digital Photography | Consumables | POS
Home | Contact Us | Submit Troubleshooting Info | Search | Help
Output | Software Solutions | Proofing | Color, Screening and Calibration | Scanning | Digital Photography | Consumables | POS
| Lotem 800 Installation Guide Hardware Installation |
Checking for Damage
Precautions
Parts Checklist
Removing the Platesetter
Handle all packing materials with care. These materials will be used again if you need to transport the platesetter in the future.
Use only the Fork lift to lift the shipping container and place it at the unpacking site. Make sure that the container is lifted only from the Front side, as indicated by the label on the packaging.
Before you begin unpacking the platesetter, ensure that the unpacking site is large enough to allow easy maneuvering of the platesetter.
For example, check the following:
Checking for Damage
Check that the shipping container is undamaged. Do not proceed with the unpacking if it is damaged in any way and notify the shipping agent immediately.

Precautions
Observe the following precautions before unpacking:
Parts Checklist
For parts list, see the PCL and GCL forms attached to the Lotem packaging.
Removing the Platesetter
A minimum of two (2) people and a Fork lift are required to unpack and lower the platesetter from its shipping pallet.
Figure 2-1 shows the unpacking process. Refer to this figure to identify the numbers appearing inside brackets in the following text.
To complete the installation, proceed from "Height Adjustment Procedure". Handle all packing materials with care. These materials will be used again should you need to transport the platesetter in the future. For details on how to re-pack the platesetter refer to "Packing-up the platesetter for shipment".
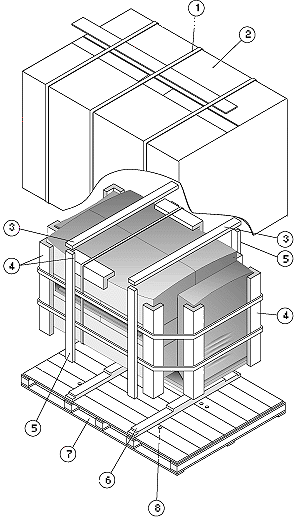
Figure 2-1: Unpacking the platesetter
Copyright (c)1998 Scitex Corporation Ltd. All rights reserved. Certain names, logos, designs, titles, words or phrases on this page may constitute trademarks, servicemarks, or tradenames of CreoScitex Corporation Ltd. or other entities which may be registered in certain jurisdictions.