Cause
|
|
Probable causes include the following:
- XY motor drifting
- Improper cassette alignment
- Processor problems
- No cardboard on bottom of cassette (This will cause only the last
plate in the cassette to be scratched.)
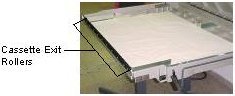
- Cassette exit roller malfunction
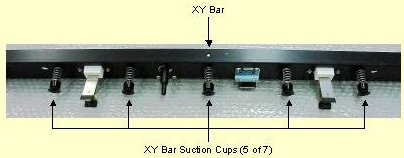
- XY bar suction cup(s) and/or paper clips damaged
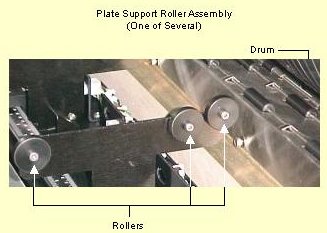
- Plate support roller malfunction
- Plate leading roller malfunction
- Dirt and/or debris on drum
- Loading roller malfunction
- Machine not leveled
- Inappropriate values entered for specific parameters
|
Solution
|
|
This section includes a detailed
troubleshooting procedure. If at any point you feel that you have found
the source of the problem, you can either process several plates to verify
that the problem has been resolved, or you can continue to the end of the
procedure.
- Keep the scratched plates for
inspection.
- Review all generic
questions with the customer.
- Verify whether the customer's
machine is a Local 2 machine. If it is, verify whether:
- Software patch #3 has been installed and
- FCO 28061 has been performed.
If they have not been, install
software patch #3 and
perform FCO 28061.
- Inspect
the following elements of both the X and Y motor assemblies for
conditions that can cause motor drifting:
- Belt.
- Motor housing securing screws.
- Motor shaft ball bearing.
- Use a spirit level to verify that the machine is properly leveled.
If it is not, answer all generic
troubleshooting questions and then, contact your service
representative, perform
machine
leveling.
- Inspect the damaged plate(s). Verify the appearance and direction of
the scratches, and proceed as follows:
- If scratches are found running from side to side over the full
width of the plate, proceed to Horizontal
scratches.
- If random scratches are found leading from the leading edge to
the tail edge of the plate, proceed to Random
vertical scratches.
- If random scratches are found leading, in general, from side to
side, answer all generic
troubleshooting questions and then, contact your service
representative.
- Check the centering motor
sprocket assembly and verify whether it includes a 2 millimeter
dowel pin, as described in FCO 27343.
If it does not, perform FCO 27343.
- Verify that the plate is
not moved too far to either the left or right by the centering
system during centering. If it is:
- Rearrange
the spacers on the right and left of the cassette entrance
on the front of the machine.
- Reinsert the cassette.
- Perform plate loading to verify that the problem has
been resolved.
Note: Perform plate loading with each
cassette that the customer uses with this machine and verify
that each works properly before leaving the site, as
described in the last step in
this document.
Horizontal scratches
If scratches are found running from side to side over the full width of
the plate:
- Check the following elements of the processor:
- Load, expose and unload at least one plate and inspect it before
processing.
- If scratches are found, return to step
1 in the previous section.
- If no scratches are found, process the plate. If the problem
persists, contact the service representative for your processor.
Random vertical scratches
If random scratches are found leading from the leading edge to the
trailing edge of the plate:
- Remove the cassette from the machine and open it.
- If the scratches appeared only on the last plate in the cassette,
verify that there is a piece of protective cardboard on the bottom of
the cassette. If there is not, place a piece of protective cardboard
on the bottom of the cassette, then load and process several plates.
If the problem persists, proceed to the next step.
- along the line of the scratches.
Look for:
- Foreign objects. If found:
- Remove the foreign objects.
- Seal the cassette by
installing a cassette seal cover (p/n 510P1P231) and,
- Install the cassette seal
cover holder by performing FCO
27885.
- Dirt and/or debris. If found:
- Remove the dirt and/or debris and,
- Clean the rollers using a lint-free cloth, as required.
- Broken or missing parts and/or restricted roller movement. If
any of the rollers are missing, damaged or not turning freely, answer
all generic troubleshooting
questions and then, contact your service representative, repair
or replace the cassette exit rollers, as required.
- for:
- Damage of any kind. If found, answer
all generic troubleshooting
questions and then, contact your service representative, replace
the damaged XY bar suction cup(s).
Note: Verify
that the correct
number of
are installed for each suction cup.
- Debris and/or dirt. If found, clean the XY bar suction cups using
a clean, lint-free cloth.
Note: This indicates
that preventive maintenance is not being properly and/or regularly
performed.
- . Look for:
- Dirt. If found, clean them using a lint-free cloth.
- Damage and/or deformation. If they are in any way damaged or
deformed, answer all generic
troubleshooting questions and then, contact your service
representative, install
new paper clips. Do not attempt to bend or otherwise adapt them.
- Place the plate on the disposal rollers (emulsion side up, leading
edge toward cassette), and visually follow the line of the scratches
toward the drum, beyond the plate edge. Along the line of the
scratches, for:
- Foreign objects. If found, remove the foreign objects.
- Dirt and/or debris. If found:
- Remove the dirt and/or debris and,
- Clean the rollers using a lint-free cloth, as required.
- Bent securing screws, broken or missing parts and/or restricted
roller movement (turn each roller with your finger.) If any of the
rollers are missing, damaged or not turning freely, answer
all generic troubleshooting
questions and then, contact your service representative, repair
or replace the plate support rollers, as required.
- Along the line of the scratches, visually inspect the punch for
protruding edges of plastic ties. If found, gently turn the plastic
tie until the edge points downward.
- Along the line of the scratches, for:
- Foreign objects. If found, remove the foreign objects.
- Dirt and/or debris. If found:
- Remove the dirt and/or debris and,
- Clean the rollers using a lint-free cloth, as required.
- Broken or missing parts and/or restricted roller movement (turn
each roller with your finger.) If any of the rollers are missing,
damaged or not turning freely, answer
all generic troubleshooting
questions and then, contact your service representative, repair
or replace the plate leading rollers, as required.
- Check the date on which the drum was last cleaned. Then, for debris or dirt. If either are found:
- Remove debris, as required.
- Clean the drum using a lint-free cloth.
Note: This indicates that
preventive maintenance is not being properly and/or regularly
performed.
- .
Note: This is especially important if plate fly-off has
occurred.
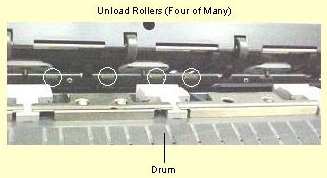
Look for:
- Foreign objects. If found, remove the foreign objects.
- Dirt and/or debris. If found:
- Remove the dirt and/or debris.
- Clean the rollers using a lint-free cloth, as required.
- Broken or missing parts (including springs) and/or restricted
roller movement (turn each roller with your finger.) If any of the
rollers are missing, damaged or not turning freely, answer
all generic troubleshooting
questions and then, contact your service representative, replace
the unload rollers and/or springs, as required.
- Remove
the lower rollers assembly and inspect the load rollers.
Note: This is especially important if plate fly-off has
occurred.
Look for:
-
Foreign objects. If found,
remove the foreign objects.
-
Dirt and/or debris. If found:
-
Remove the dirt and/or
debris and,
-
Clean the rollers using a
lint-free cloth, as required.
-
Broken or missing parts
(including springs) and/or restricted roller movement (turn each
roller with your finger.) If any of the rollers are missing,
damaged or not turning freely, replace
the load rollers and/or springs, as required.
- Close all doors and load, expose and
process one or more plates. If the problem persists, answer all generic
troubleshooting questions and then contact your service
representative.
- Regardless
of the type and direction of the scratches, insert the open cassette
into the machine, leave the front door open and, using a cheater,
perform plate loading.
Note: If the customer is using a dual cassette, be sure to
redefine the cassette as dual loading before leaving the site.
- Watch the plate as it is loaded
and verify that, when the plate is resting on the disposal rollers and
is re-secured by the suction cups, the XY bar does not press downward
on the plate so hard that scratches appear in the emulsion. If it
does, adjust the value for the following parameter, as required:
Utilities>Hardware\Loading System\Loading
System\Load Plate\From Cassette to Punch Entry Stage\"Y Down
After Punch"
- Perform the steps described in, "Before
You Finish".
|


 Spacers are the washers that are placed on the inside of the XY bar,
through which each XY bar suction cup vacuum tube runs.