Home | Contact Us | Submit Troubleshooting Info | Search | Help


    Output | Software Solutions | Proofing | Color, Screening and Calibration | Scanning | Digital Photography | Consumables | POS


Plate double-picking on Picker 3 due to improperly adjusted picker head travel distance


Product

 
  • Trendsetter Autoloader
  • Trendsetter NEWS

Machines affected


All with Picker 3


Component


Picker head (Picker 3)


Error

 
  • Errors due to double-picking may include:
    • Plate fly-off errors (if one or both plates are not successfully loaded)
    • Focus errors

Symptoms

 
  • Error messages and operator suspend conditions
  • Image artifacts (if both plates successfully loaded and top plate is imaged; this should be extremely rare, but has been known to happen)
  • Plate fly-off
  • One or both plates have damaged leading edges (from hitting LEC clamps or registration pins, and/or being dropped)

Cause


Improperly adjusted picker head travel distance

If the screws controlling the distance the picker head moves into the plate stack are not adjusted properly, the picker head will move too far into the stack. This  exerts excessive pressure on the plate stack, forcing out any air between the plates, and causing them to stick together. As a result, double-picking can occur (especially with thinner plates—0.008 in. (203µ), for example).


Solution


Adjust the picker head travel distance

Note: If FCO CA08150 (picker wrist stopper bracket upgrade) has not yet been applied, order and install upgrade kit #512-00309A as described in the FCO instructions. This upgrade adds a new, reinforced bracket to the picker wrist assembly to hold the stoppers in place more securely.

To adjust the picker head travel distance:
  1. Open the cassette door and remove any plates from the bay.
  2. In Service Shell, enter commands:
    picker up
    picker in
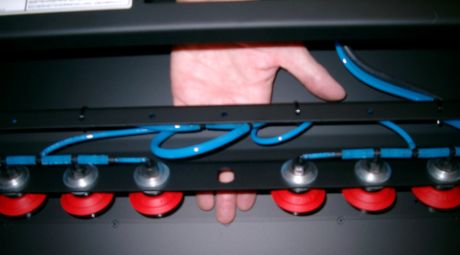
  3. Use a ruler to measure the gap behind the picker head and the load bay rear panel. The gap should be approximately 25–30 mm, and should be consistent across the back of the picker head.

    If this gap is less than 25–30 mm, or it is narrower at one end than the other, proceed to step 4.
    If the gap is 25–30 mm, and is consistent across the length of the picker head, proceed to step 8.

  4. Enter command
    picker wrist in

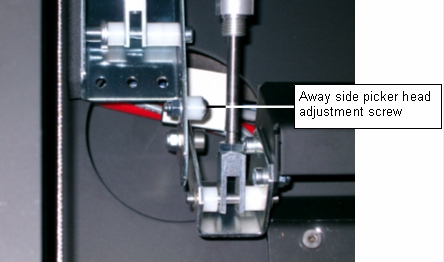
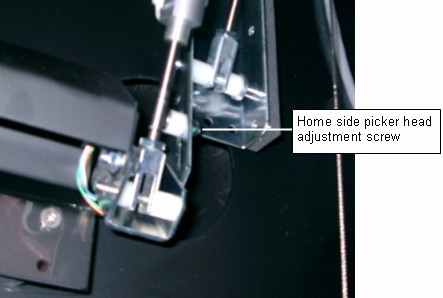
    to access the adjustment screws. The screws are located in slotted holes on either side of the picker head.

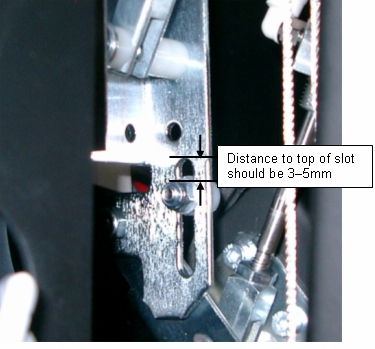
  5. For each side of the picker head, use an adjustable wrench to hold the nut and loosen the screw with a 2.5 mm hex key. Slide it down to the proper distance from the top of the slot (approximately 3 mm, for a 25–30 mm gap between the picker head and the load bay rear panel). Make sure both sides of the picker head are adjusted with the same distance from the top of the slot.

  6. In Service Shell, enter commands:
    picker out
    picker down
  7. Load the bay with a stack of plates, and do a series of jobs to check the plate picking.
  8. If the double plate-picking problem is not eliminated, consider the possibility that the wrist or picker head in/out cylinders are leaking. See troubleshooting procedure.

See also


Technical contact(s)
 

Ray Levasseur

Submitted by
 

Ray Levasseur

Date submitted
 

09 Jun 2004


    Copyright © 2005 Creo Inc. All rights reserved. Confidential. Back to top.