Background
|
|
The objective performing a delay test is to calibrate the delay parameter
for the Data Distribution Board (DDB), so that the exposed horizontal
lines are perfectly straight. The plate is exposed at a resolution of
100 dpi, in different delay values. The optimal delay value is the delay
value of the best exposure. Lotem Controller automatically calculates
the optimal delay values for other resolutions.
Note: Test results do not depend on the plate type, size, or thickness,
so this test can be performed on any plate type that the customer uses.
|
Procedure
|
|
- Load a plate.
- Open the Lotem Calibration dialog box:
- For Lotem 400 Xposeon the Xpose Utilities panel, double-click
LotemCalib.
- For Lotem 400proceed as follows:
- In Brisque, from the Launch Pad, open the setup panel, and then
double-click Devices.
- In the Output Device Handling dialog box, in the Device section,
select Plate Setter > Lotem > Lotem400.
- In the Operations section, select Lotem Calibration.
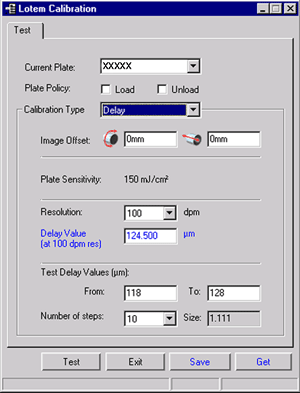
- In the Lotem Calibration dialog box (example shown for Lotem Xpose),
in the Calibration Type list, select Delay.
- Select the plate type:
- For Lotem Xposein the Current Plate type dropdown list
- For Lotem 400in Media
- Define the Plate Policy:
- Load plateAutomatically loads a new plate before the
test begins. If you clear this option, you can reuse a plate for additional
calibration tests.
- Unload plateAutomatically unloads the plate after the
test. If you clear this option, you can reuse the plate for additional
calibration tests.
- Define the Image Offset values:
- Horizontal offsetthe value around the drum in mm
- Vertical offsetthe value along the drum in mm
If you use the same plate for several tests, use different offset values
for each test.
Note: The (0,0) offset coordinate is located at the upper-left
corner of the plate.
- In the Test Resolution list, select 100.
- In the Test Delay Value (µm) area, type the values for
the delay range. For example, if the listed delay value is 124.09 µm,
it is recommended that you enter a range of 123 to 125.
- In the Number of steps list, type the required number of exposures
for the delay range. The recommended number of steps is 11.
- Click Test to initiate the delay test according to the settings.
The application performs several exposures.
- Develop the plate and examine the results.
- Determine the optimal delay value for a resolution of 100 dpm. The
optimal delay value is the delay value of the best exposure. Type this
value in the Delay Value box.
- Click Save. The optimal delay value is transfered to the Lotem
controller. Lotem Controller automatically calculates the optimal delay
values for other resolutions.
Note: If required, click Get to
load a previous delay test result from the Lotem Controller application.
|