| |
Note: During this procedure, you will be removing a number of
screws. Make sure to save these screws for future installation purposes.
Removing the MSB_C motherboard
- Quit the Magnus 400 Controller software, and turn off the platesetter.
- To enable easy access to the rear of the punch conveyor (punch cover
side), slide the punch conveyor out from the punch conveyor guides (on
the rear of the platesetter), and push it away from the platesetter.
- On the underside of the punch conveyor, remove the two hex screws
that secure the E-box cover to the E-box, and remove the cover.

- Slide the MSB_C out of the E-box, and set it aside.

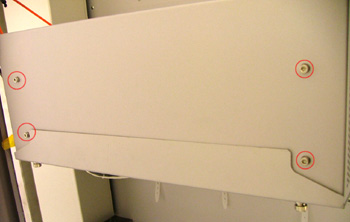
- On the underside of the E-box, remove the four screws that secure
the MSB_C tray to the E-box, and remove the tray.
- On the MSB_C motherboard, disconnect all (12) connections. Route the
cables to the side so that they do not block access to the motherboard.

- Remove the 10 screws that secure the MSB_C motherboard to the E-box,
and remove the motherboard.
Installing the MSB_C motherboard
- Insert the new MSB_C mother board into the E-box, and secure with
the 10 screws that you removed earlier.
- Reconnect all cable connections. Use the following table to make sure
that all the cables are connected to the correct connector on the motherboard.
| Cable |
Harness |
Motherboard |
| MSB J23 (black/white) |
MSB J5 Harness |
J21
|
| MSB J27 (gray) |
|
J27
|
| MSB J31 (white) |
Alignment System Harness |
J32
|
| MSB J32 (gray) |
|
J31
|
| MSB J13 (red/black) |
MSB J5 Harness |
J13
|
| J21 (gray) |
Punch Harness |
J21
|
| MSB J5 (gray) |
MSB J5 Harness |
J5
|
| J6 (white) |
Roller motor |
J6
|
| MSB J7 (gray/white) |
|
J7
|
| J11 (gray) |
Alignment System Harness |
J11
|
| J12 (gray) |
Punch Harness |
J12
|
| Fan |
|
Fan connector |
- Reinstall the MSB_C tray.
- Reinstall the MSB_C.
- Reinstall the E-box cover.
- Push the punch conveyor back toward the platesetter. Use the punch
conveyor guides on the rear of the platesetter to align the punch conveyor
with the platesetter.
- Turn on the platesetter, and start the Magnus 400 Controller software.
|

