Solution
|
|
This section includes a detailed
troubleshooting procedure. If at any point you feel that you have
found the source of the problem, you can either process several
plates to verify that the problem has been resolved, or you can
continue to the end of the procedure.
- Keep the plates that were not successfully picked up from
the cassette.
- Review all generic
troubleshooting questions with the customer.
- Verify whether the
customer's machine is a Local 2 machine. If it is, verify
whether:
- Software patch
#3 has been installed and
- FCO
28061 has been performed.
If they have not been:
- Inspect both the following
elements of both the Y and X motor assemblies:
- Belt. Use a jig
(p/n 507A3E593) to check the belt tension. If the tension is not
acceptable, adjust the Y motor belt tension, as required.
- Motor Housing securing screws. Use a
screwdriver to verify whether the screws are tightly
secured. If they are not, tighten the motor housing
securing screws.
- Motor Shaft Ball Bearing. Closely
inspect the motor casing around the area of the
shaft (shown below—use a magnifying glass, as
required). Look for:
- Damage of any kind.
- Protruding springs.
- Small, metal balls stuck on the outside of
the motor.
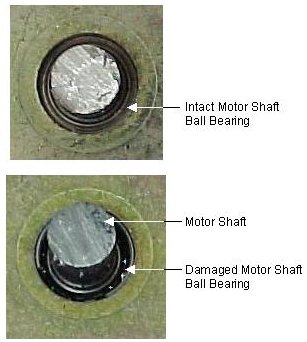
If any of these are found, replace the Y motor
assembly.
- Repeat steps 4a through 4c for
the X motor assembly.
-
If they are not, modify the plate definition or create a new
plate definition, as described in the user manual, and
perform plate loading. If the problem persists, proceed to
the next step.
- Inspect the plate(s). Look for damage, defects or warping.
This may indicate manufacturer’s defect, or damage that
was caused to the plate either during handling or due to bad
storage conditions, such as extreme hot or cold. If defect
or damage is found, load new, undamaged plates, and then
perform plate loading. If the problem persists, proceed to
the next step.
Note: If conditions in the plate storage room do
not meet product guidelines, consult your plate supplier for
advice.
- Visually inspect the inside of the cassette. Verify that:
- There are no foreign objects such as cardboard,
packing material or debris in the cassette. If there
are, remove the foreign objects and perform
cassette loading.
Note: If this is a recurring
problem, answer all generic
troubleshooting questions and then, contact your
service representative.seal
the cassette by installing a cassette seal cover
(p/n 510P1P231). In addition, install the cassette
seal cover holder by performing FCO 27885.
- The plates are properly loaded and positioned in the
cassette. If they are not, reload undamaged plates
into the cassette and perform plate loading.
- Use a spirit level to verify that the machine is properly
leveled. If it is not, answer
all generic
troubleshooting questions and then, contact your service
representative.perform
machine
leveling.
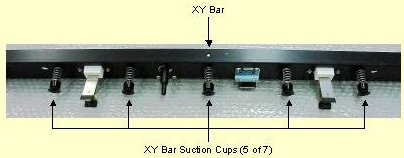
- for:
- Damage of any kind. If found, answer
all generic
troubleshooting questions and then, contact your
service representative.replace
the damaged XY bar suction cup(s).
Note: Verify that the correct
number of
are installed for each suction cup.
- Debris and/or dirt. If found, clean the XY bar suction
cups using a clean, lint-free cloth.
Note:
This indicates that preventive maintenance is not being
properly and/or regularly performed.
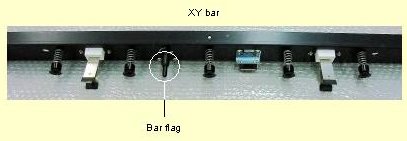
- and verify whether it moves up and down
freely. If it does not,
answer all generic
troubleshooting questions and then, contact your service
representative.:
- Remove
the XY bar cover and inspect the bar flag and bar flag
detector for debris, dirt and/or other obstruction. If
found, clean the bar flag and the inside of the bar flag
housing, and remove any debris or obstruction, as
required. Use a Q-Tip to thoroughly clean the detector.
Make sure that no pieces of cotton are left on the lens
after cleaning. If the problem persists:
- Replace
the bar flag according to the new bar flag and
housing FCO.
- . If
it is not:
- Run the Lotem 800 Diagnostic Software (select Machine>
Bar Flag Detector). If the result is fail,
with the XY bar upper cover removed, visually
inspect the bar flag detector wiring and verify that
it is properly attached. If it is not:
-
during loading. If it does:
- Raise the level of the plates in the cassette by
placing several used plates covered by a piece of
cardboard in the bottom of the cassette, and then
placing the plates on top of the cardboard. Then:
- Perform plate loading. If the problem persists, or
if this is good only as a temporary solution,
answer all generic
troubleshooting questions and then, contact your
service representative.install
GTO plate guides and instruct the customer regarding
when and how to use them.
Note:
Ensure that the XY bar suction cups do not hit the
GTO plate guides during loading.
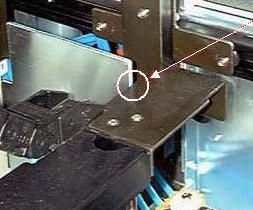
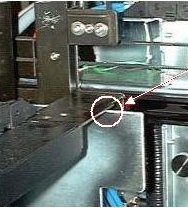
- Verify that the loading system is properly aligned, as
follows:
- .
If either component is not properly aligned, answer
all generic
troubleshooting questions and then, contact your service representative.align
the loading system.
- Close all doors and perform
plate loading using undamaged plates (inspect the plates
before loading them into the cassette). Also, verify that
they are not too cold to use due to poor storage conditions.
If the problem persists, answer all generic
troubleshooting questions and then, contact your service
representative.
- Insert the open cassette
into the machine, leave the front door open and, using a
cheater, perform plate loading.
Note: If the customer is using a dual cassette, be
sure to redefine the cassette as dual loading before
leaving the site.
- Watch the plate as it is
loaded and verify whether it hits, or is hit by, any machine
parts as it progresses. If it does, adjust the values for
the following parameters, as required:
- Utilities>Hardware\Loading System\Loading
System\Loading System Setup "X Position In
Cassette (mm)
- Utilities>Hardware\Loading System\Loading
System\Loading System Setup "Prepare Y to catch
Plate (mm)
- Utilities>Hardware\Loading System\Loading
System\ "X Prepare to Catch Plate (mm)
- when being lifted from the cassette. If one
or more of the suction cups do not fully secure the plate,
remove the XY bar cover and:
- Verify that the correct
number of
are present for each suction cup. If the correct
number of spacers is not present for each suction
cup, install or remove spacers, as required. Then:
- Inspect the XY bar suction cup vacuum tubes for
kinks or damage. If found, straighten kinked tubes,
and/or replace damaged tubes as required, and repeat
step 16. If the problem persists:
-
Verify
that the XY suction cup vacuum level is correct by using a
vacuum gauge to check the vacuum level. If it is not correct,
adjust the vacuum level, as required.
- Verify that the
paper/metal detector is functioning properly. If it is not:
- Verify that the correct
values have been entered for the following plate separation
parameters in the registry:
Note: It is recommended to use the default values
for these parameters. If it is necessary to change them, do
not change them by much.
- Utilities>Hardware\Loading System\Loading
System\Load Plate\From Cassette To Punch Entry Stage
"Y Plate Rel Up In Cassette (mm)
- Utilities>Hardware\Loading System\Loading
System\Load Plate\From Cassette To Punch Entry Stage
"X Rel Backward For 03 (mm)
- Perform the steps described in,
"Before
You Finish".
|


 To verify media (plate) definition: