|
|
To print out the PM instructions below, click on the print icon  at the top of the page.
You may also want to print the PM parts list and detailed PM procedures:
Notes:
Note: To properly assess image quality, the processor chemistry should have been serviced and filled with fresh chemistry within the last 24 to 48 hours.
Expose a Creo Plate Test Target (CPTT) in the client's favorite format.
This will serve as your reference.
| Imaging | What to Do | Reference |
|---|---|---|
| Imaging quality | Look at the CPTT reference file that you exposed earlier. | |
| Laser (LDA head) |
Check maximum laser calibration (300 mW). Compare the results with the results of the last PM. |
|
| Laser (Quantum) |
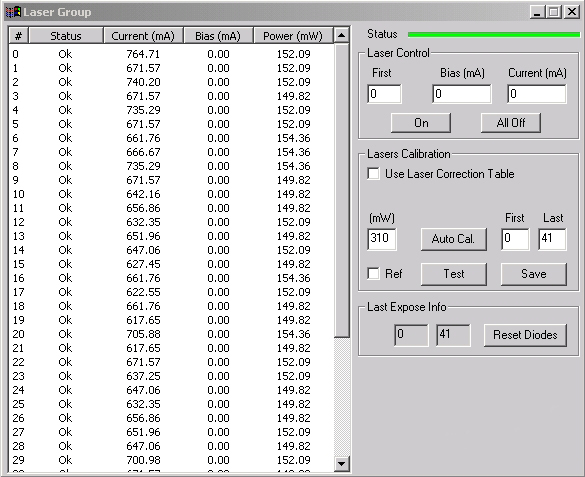
Check laser graph and power. Compare the results with the results of the last PM. |
 |
Objectives: Check safety first! Determine that all Magnus 400/Magnus 400 II components are safe to operate and to work on. Walk around the entire device to examine the exterior and surroundings for damage and any issues that may require further investigation or repair.
| Safety and Exterior Evaluation | What to Do | Reference |
|---|---|---|
| Site conditions | Verify that the site conditions, including humidity and temperature, are within the specifications. Record the humidity and temperature readings on the PM report, and inform the operator of any unfit conditions. | Lotem 400 / Lotem 400 Quantum Family Site Preparation Guidelines |
| Doors, panels, and interlocks |
|
|
| Debris cabinet hose | Verify that the exterior hose is not clogged, crushed, broken. | |
| Cooling fluid leaks | Check the floor at the side of the platesetter and verify that there are no external fluid leaks. |
|
|
| System Operation | What to Do | Reference |
|---|---|---|
| Backup settings (LDA and Quantum) |
Back up the registry and the database folder. |
For Xpose devices, use the Backup
and restore utility
|
| Backup firmware (Quantum only) |
Back up the following and list the version. Compare to the latest controlled release:
|
Backup Procedure |
| Update firmware (Quantum only) |
Update the following to the current controlled release version.
|
|
|
Objectives: Check everything, then go back and
repair or adjust as required.
| Assemblies and components | What to Do | Reference | ||
|---|---|---|---|---|
| FCOs |
|
FCO page for relevant configuration, and
FCO Tracker FAQ |
||
| Board diagnostics |
Run diagnostics on the boards. |
|||
|
Loading Objectives: Determine that the platesetter loads and unloads correctly. Note irregularities for further investigation. Load and unload at least three plates of different sizes. Verify that
the loading and unloading sequences progress successfully. |
||||
| Loading - Manual | ||||
| Loading tray rollers and wheel | Clean loading tray rollers and wheel with a clean cloth and press blanket cleaner (such as rubber rejuvenator). Do not use alcohol. | |||
| Loading - MCU/SCU | ||||
| Detectors |
|
|||
| XY rails | Clean the X and Y rails, and then lubricate tunnels with NSK grease. | |||
| XY bar | Clean the XY bar with a clean cloth and alcohol. | |||
| Suction cups | Check suction cups for wear. If worn or fractured, replace. | |||
| Paper disposal rollers & tweezers |
|
|||
| Punch slugs | Using a vacuum cleaner, remove the slugs from the inside of the platesetter, and from the slugs box. | |||
|
Drum system |
||||
| Detectors |
Clean the following detectors with a cotton swab and alcohol:
|
|||
| Drum vacuum holes |
With the vacuum turned on, use the 0.8 mm drill to clean the drum vacuum holes. |
|||
| Drum surface | Clean the drum surface with a clean cloth and press banket (rubber rejuvenator). | |||
| Vacuum pump pressure |
Check the vacuum pump pressure and adjust if required. |
|||
| Carriage system | ||||
| Detector |
Clean the following detectors with rice paper and alcohol:
|
|||
| Lens protector (LDA heads) |
|
|||
| Light detector |
Note: For Quantums, before cleaning the light detector, remove the unload tray. You will reinstall it later, before cleaning the unload rollers. Clean the light detector with a cotton swab dipped in alcohol. |
|||
| Oil bracket and V-block felt |
Replace the oil brackets and lubricate the V groove, if required. | |||
|
Unloading system Before performing PM on the unloading system, reinstall the unloading tray. |
||||
| Unload rollers | Clean unload rollers with a clean cloth and press blanket cleaner (such as rubber rejuvenator). Do not use alcohol. | |||
| Detectors |
Clean the following unload detectors with a cotton swab and alcohol:
|
|||
| Unload conveyor | Visually inspect the belts for any wear or tear. | |||
| Air system | ||||
| Air pressure unit |
Verify that the customer replaces filters every year. |
|||
| Fans |
Using a vacuum cleaner, clean the air system fans. |
|
||
| Vacuum pump components | ||||
| Vacuum pump filter and blades |
|
|||
| Vacuum hoses | Visually check the hoses for wear or damage and replace if required. Verify that the exterior vacuum hose is not crushed or broken. | |||
| Cooling system (LDA head) | ||||
| Temperature | While the platesetter is on, verify that the upper red reading on the temperature is between 18.8 and 20.2° C. | |||
| Cooling liquid | Verify that the customer refills cooling liquid regularly | Refilling the Chiller | ||
| Fan cleaning | Visually verify that the fan is not blocked by dust. If required, use a vacuum cleaner to remove the dust, and then confirm that the fan is operating smoothly. | |||
| Cooling system (Quantum) | ||||
| Cooling system - Strainer | Debris indicates dirt in the cooling system. Check that the strainer is free of debris. | |||
| Cooling system - Pump |
|
|||
| Cooling system - Reservoir | Check the reservoir and verify:
|
|||
| UDRC | ||||
| Filter replacement |
Verify that the customer replaces filters.
|
|||
| External conveyor | ||||
| External conveyor | Oil the ball bearings. | |||
|
|
To complete the PM, the Magnus 400 Maintenance Checklist must be signed off by the customer and returned to Kodak.
 LDA:
Quantum: