Home | Contact Us | Submit Troubleshooting Info | Search | Help
Output | Software Solutions | Proofing | Color, Screening and Calibration | Scanning | Digital Photography | Consumables | POS
Home | Contact Us | Submit Troubleshooting Info | Search | Help
Output | Software Solutions | Proofing | Color, Screening and Calibration | Scanning | Digital Photography | Consumables | POS
A Field Change Order (FCO) contains only the information from an Engineering Change Order (ECO) that relates to service.
To look up a customer's install base, go to the Customer Library and search by customer name. Click the Installed Base tab.
The HundredLabelCrossReference.xml file is used in the Device Change Tracker applet in Service Shell versions 3.1 and later. The .xml file contains the same information as the .pdf document, and allows the user to enter FCO
information quickly by 100 label #.
Save the file to the customer's workstation, click the Import 100 Label Map button in the Device Change Tracker, then browse to the saved .xml file. For more information, refer to the
Service Shell online help.
These 100 labels have been replaced by a single 100 label document—707-00600A as per ECO CA11575.
ASAP | FYI | Next visit | Next failure | Next PM
| FCO | Description | Release Date | Priority | Service Actions |
|---|---|---|---|---|
| CA10533 | MCU jackscrew motor brake added. | 21 Sep 2006 | ASAP | Install this FCO on devices MT237 (MM150) and before. The motor brake requires CR 4.0 and later.
Kit: 512-00375A-B Procedure: See MCU Braked Motor Upgrade. Estimated installation time is 2 Hrs. |
| CA09968 | MCU jackscrew backup nut and lubricator added. | 05 July 2006 | ASAP | Install this FCO on devices MT211 (MM136) and before with the exception of MT025, MT015, and MT172.
Kit: 512-00367A (contact service logistics for availability of parts). For MCU devices that do not have a lubrication system (MM078/MT119 and later), you will also need a new upper nut plate (252-01626C) that has a cutout for the lubricator fitting. Procedure: See MCU Jackscrew Nut Upgrade. Estimated installation time is 6 Hrs. |
| CA09028 | Safety release mechanism upgrade for the backbone and tilt arm. | 02 Feb 2006 | ASAP | Install this FCO on devices MT001 to MT023.
Kit: 512-00338A Procedure: See Safety Release Mechanism Upgrade Procedure |
| CA05970 | Version A MCU carts do not prevent the cassettes from being lifted off the cart. This is a potential safety hazard. | 05 Jan 2005 | ASAP | Upgrade version A carts. Implemented on MM038/42/43/48/50/51 and later.
Kit: 512-00232A Procedure: MCU cassette latch upgrade |
| CA04718 | Increase flap cylinder stroke, change mounting | 15 Jul 2004 | ASAP | Upgrade device MT014 only. Done. |
| CA04549 | Unload table pivot pin sliding out of frame. Reactivate collars to hold shaft. | 26 Jul 2004 | ASAP | Upgrade devices MT006 to MT013.
Kit: 512-00145A Procedure: FCO CA04549 |
| FCO | Description | Release Date | Priority | Service Actions |
|---|---|---|---|---|
| CA15230 | APL corner panel series 4 upgrade. | 13 May 2008 | FYI | Optional purchaseable upgrade.
Kit: 512-00512A Procedure: APL Corner Panel Upgrade |
| CA14599 | Punch deflector upgrade. | 29 Feb 2008 | FYI | Install this upgrade kit at sites that experience plate sagging. The bowing can cause the side registration pin to sometimes miss the edge of the plate and not register correctly.
Kit: 512-00497A (the registration bar from the old assembly must be reused). |
| CA14179 | Plate gripper upgrade. | 13 Dec 2007 | FYI | Install this upgrade at sites that experience plate picking problems with small plates.
Factory installed on APL MP0019 (MT383). Kit for series 3 and 4 devices: 518-03048A. Kit for beta devices: 518-03099A. Procedure: Picker P-cup Gripper Upgrade Procedure |
| CA13466 | GMCE board updated to version F to accomodate KIL UDRCs. | 24 Oct 2007 | FYI | GMCE version E can still be used on all CCA devices. Use version F when old stock is depleted. |
| CA12728 | Leading edge clamp funnel upgrade.
This upgrade is to improve plate loading of large wavy plates. Requires CR4.01 or higher. |
29 Jun 2007 | FYI | Funnel upgrade kit: 512-00406A
Procedure: Leading Edge Clamp Funnel Upgrade. Estimated installation time is 8 Hrs. See also FCO CA10199. |
| CA11617 | Camera mounting shim added.
A shim is added to prevent disassembly problems. |
29 Jun 2007 | FYI | Kit: 512-00420A
Procedure: Edge Detect Camera Shim Installation. Estimated installation time is 2 Hrs. |
| CA09820 | Fan box upgrade. | 26 Sep 2006 | FYI | The fanbox bracket change allows the left shin panels to be easily assembled since the caster bracket will not interfere
with the panel. Because the problem is worst on semi-automatic devices, some of those devices may need to be upgraded.
If the fanbox will be used with propylene glycol coolant, the fittings must also be changed (included in the kit). Upgrade devices MT241 and earlier. Kit: 510-00120B. Procedure: Fan box upgrade. |
| CA10411 | New uptime kits for Series 1 and Series 2 devices. Also released are kits options for delicate media picker and TH3. | 07 July 2006 | FYI | See the Maintenance page for the latest uptime kit BOMs. |
| CA09920 | Remove the tape clamps to accomodate 63 in. plate ejection | 05 May 2006 | FYI | If the customer is using 63 in. plates, remove both deflector tape clamps (252-09860A) so that the large plates can be ejected without being damaged. |
| CA09599 | MCU jackscrew nut replacement kit updated. | 16 Mar 2006 | FYI | Kit: 512-00352A
Procedures: See Measuring the MCU Jackscrew Nut Backlash; and Replacing the MCU Jackscrew Nut |
| CA09036 | Drum vacuum hole cleaning kit released | 21 Dec 2005 | FYI | Inspect and clean the drum vacuum holes every 12 months as described in the planned maintenance procedures.
Kit: 518-01561A Procedure: Cleaning the drum vacuum holes |
| CA08918 | Load table upgrade for 0.008 in. plates.
This FCO is replaced by FCO CA11864. |
06 Jan 2006 | FYI | Kit: 512-00331A
Procedure: Load Table Bearing Pusher Upgrade |
| CA08627 | New blower for UDRC | 31 Oct 2005 | FYI | No field upgrades affected.
The blower in the UDRC has been changed for one with a wider operational voltage—200V to 240V. There are now only two different cabinets: one for 50 Hz and one for 60 Hz. See the Debris Removal page for details. |
| CA08201 | Removal of the autoluber from the MCU jackscrew in production.
MM078 and later will no longer have the autoluber installed. |
16 Sep 2005 | FYI | Do not replace the autoluber if it is not working. Grease the MCU jackscrew during each PM using Viperlube 404-00135.
Procedure: Magnus VLF MCU Grease Lubricators |
| CA07602 | Magnus VLF processor interface upgrade kit | 08 Aug 2005 | This upgrade is a chargeable option by customer request only. | Kit: 015-00780A
Procedure: Processor Interface Installation Guide (709-00536A) |
| CA06993 | Magnus VLF Speed upgrades
S to V speed; S to F speed; F to V speed |
09 Jun 2005 | On customer request only. | Complete upgrade questionnaire to determine upgrade BOM.
Procedure: Magnus VLF Speed Upgrade |
| CA06435 | TH2 Z-stage upgrade | 26 May 2005 | On customer request only. | Inactive. See FCO CA10082. |
| CA06405 | MCU flush plate loading upgrade. | 13 Apr 2005 | By request only - approval from product management needed | All chin MCUs
The following MCU’s after MM041 shipped with the chin-style configuration: MM038/42/43/48/50/51. After that, the MCU shipped exclusively with Flush Plate Loading. Upgrade kit: 518-01020A Tools and jigs kit: 516-00016A Procedure: MCU Flush Plate Loading Upgrade |
| CA06095 | Drum vaccum pump upgrade | 24 Feb 2005 | On customer request only. | Only install this upgrade kit for customers wanting to run 0.15 mm plates. Production implemented on MT090.
Kit 512-00230A before FCO CA06461 is implemented. Kit 518-01074A after FCO CA06461 is implemented. Procedure: DVP Vacuum Dump Valve Upgrade |
| CA05595 | Load table: rail extrusion tolerance problems. New tolerances and a chamfer are added to prevent rubbing and to increase tape longevity. | 03 Nov 2004 | FYI | Upgrade machines MT079 and before.
Some load tables may have rubbing on the traveller and the rails are polished smooth. UHMW tape is added to the traveller to reduce the friction. |
| CA05567 | Procedure for programming the table bottom slipsheet sensor. | 13 Oct 2004 | FYI | Programming the table bottom slip sheet sensor |
| CA05073 | New procedure to align unload table home sensor. | 12 Aug 2004 | FYI | Adjusting the unload table home sensor |
| CA04909 | 100 Labels updated. | 13 May 2005 | FYI | The 100 label documents are updated as of MT089. For MT088 and before, service engineers must update the 100 labels during the next field sweep. The 100 label documents can be accessed at the top of this page. |
| CA04633 | Upgrade procedure and jig for load table front beam. | 05 Aug 2004 | FYI | Upgrade machines MT012 and before.
Kit: 512-00115A (includes jig #690-00271) Procedure: FCO CA04633 |
| FCO | Description | Release Date | Priority | Service Actions |
|---|---|---|---|---|
| CA16058 | Pull cord assembly safety upgrade. | 16 Jun 2008 | Next visit | Kit: 512-00523A
Procedure: Pull Cord Safety Upgrade. Allow for 30 minute installation time. |
| CA14578 | Picker mate tab upgrade. | 25 Feb 2008 | Next visit | Install on APLs MP005 and MP009 to MP012.
Kit: 512-00500A Procedure: Picker Mating Tab Upgrade. Allow for 30 minute installation time. |
| CA08969 | Center shroud panel guard bracket added | 22 Dec 2005 | Next visit | Kit: 512-00335A
Procedure: Center Shroud Panel Guard Bracket Upgrade |
| CA08833 | Thermal protector added to the MCU motor to meet regulatory requirements.
This FCO is included in FCO CA10533. |
22 Dec 2005 | Next visit | Install on all MCU motors that do not have the thermal protector installed.
Kit: 512-00324A Procedure: Adding a Thermal Protector to the MCU Motor |
| CA07949 | Change home side rear hood strut to a locking one | 07 Mar 2006 | Next visit | Parts are not currently available - 13 July 2006.
Kit: 252-09346A Procedure: Locking Hood Strut for Magnus VLFs |
| CA07607 | Tilt cylinder screws too long/drum motor screws changed | 09 Sep 2005 | Next visit | Add four washers to the bottom screws if they are longer than M10x70.
Check that the screws holding the drum motor onto the bracket are not interfering with the drum belt. Change to low head screws if necessary. |
| CA07469 | Yellow safety label added to abort switches | 20 Jun 2005 | Next visit | Add safety labels to the abort switches on machines MT090 and before.
Kit: 512-00299A |
| CA07238 | FPL MCU cart upgrade to prevent the home sensor from getting misaligned. | 21 Oct 2005 | Next visit | Install on all FPL MCUs and all MCUs that have had the FPL upgrade.
Kit: 512-00286A Procedure: DWG and installation instructions |
| CA07204 | Beta Flush Plate Loading MCU cassette latch upgrade. | 17 Jun 2005 | Next visit | MT049, MM026, MT059, & MM033.
Time required: One full day for one person. Kit: 512-00280A Procedure: Cassette Latch Upgrade for FPL MCUs |
| CA06631 | Enabling the safety release mechanism for the backbone and tilt arm. | 26 Oct 2005 | Next visit | Install this FCO on devices MT024 to MT137.
Kit: 512-00261A Procedure: See Safety Release Mechanism Upgrade Procedure |
| CA06506 | Adding SSR compactor wrench. | 15 Sep 2005 | Next visit | Time required: Half an hour for one person.
Kit: 512-00262A Procedure: Installing a Slipsheet Removal Unit Compactor Wrench |
| CA06449 | Plenum flap upgrade. The hole in the plenum flap must be increased to accomodate the plastic snap-in bushing. Weldings on both sides of the bracket are also added. | 16 Mar 2005 | Next visit | Upgrade MCUs MM040 and before.
Kit: 512-00258A Procedure: Check the bracket on the plenum flap 252-02674B. It could be broken because of the poor spot welding which will cause plate/slipsheet picking probems. Replace if necessary. |
| CA06391 | When loading the cassettes into the MCU, the corner of the cassette can get hooked on the plenum roller. This kit will shim the MCU cassette away from the plenum. | 03 Feb 2005 | Next visit | Implement on approximately MM039 and before.
Kit: 512-00245A Procedure: MCU cassette upgrade Assembly drawing: DWG |
| CA06338 | SSR access panel switch can be damaged when the access panel moves above it. This protector kit will prevent the panel from moving above the switch. | 27 Jan 2005 | Next visit | Upgrade machines MT074 and before.
Kit: 512-00247A Procedure: SSR access panel switch bracket upgrade |
| CA06264 | MCE device firmware no longer requires the use of a dongle. | 27 Jan 2005 | Next visit | MCE uptime kit: 518-00143A
Procedure: Remove dongle from all devices. |
| CA06184 | Friction on the SSR access panel rips the plate off the fetcher V-cups. | 27 Jan 2005 | Next visit | Upgrade machines MR049 and before.
Kit1: 512-00246A - access panel darts Procedure: SSR Access Panel Upgrade Assembly drawing: SSR Access Panel - see sheet 2 |
| CA06165 | Change fuses in the power entry box and drum vacuum unit to accomodate blower inrush current. Only replace the fuses where the input power is 50Hz alternating current. | 22 Dec 2004 | Next visit | Upgrade machines MT072 and before.
Kit: 512-00233A Procedure: Debris and drum vacuum pump fuse upgrade |
| CA05631 | Improved cup adjustment mechanism on unload table traveller. | 23 Nov 2004 | Next visit | Upgrade machines MT067 and before.
Kit: 512-00218A Procedure: Unload table traveler upgrade |
| CA05156 | The 1/4 turn fastners on the head access panel are not engaging properly. | 26 Aug 2004 | Next visit | Upgrade machines MT006 onwards.
Kit: 512-00191A Procedure: Add a washer as a spacer to ensure that the fastner fully engages the spring. |
| CA05122 | New backbone parts required for adjusting the LEC openings. | 09 Sep 2004 | Next visit | Kit: 512-00185B-B
Procedure: Backbone Upgrade for Adjustable LEC Openings  |
| CA04998 | Add a hole to the laser shroud for the head focus screwdriver to access the focus setscrew. | 13 Oct 2004 | Next visit | Upgrade machines MT046 and before. This applies to 5183 automatic machines only.
Kit: 512-00209A Procedure: Swap the old laser shroud with the new one. |
| CA04871 | Speed of Picker up-action must be slowed down for smoother movement.
Slip sheet detector cylinders changed to improve reliability. |
30 Jul 2004 | Next visit | Upgrade machines MT024 and before.
For the picker up/down speed control, replace both 0.15mm orifices (#55-1065) with a smaller 0.1mm orifice (#336-00179) on the cylinder in the plate picker assembly 500-00446A (item 0190). DWG For the slip sheet mirror in/out speed control, install 336-00065 and 336-00105). |
| CA04779 | Add washers to prevent/reduce wear on the V-rollers on the MCU docking cart. | 27 Jul 2004 | Next visit | Upgrade machines MT018, MT017, and MT015 and before.
Kit: 512-00162A (4 x M12 washers part #52-4064 and a circlip tool) Procedure: Add these washers between the V-roller and the springs. |
| CA04754 | Screw and washer missing on top of MCU jack screw | 27 Jul 2004 | Next visit | Upgrade machines MT015 and before.
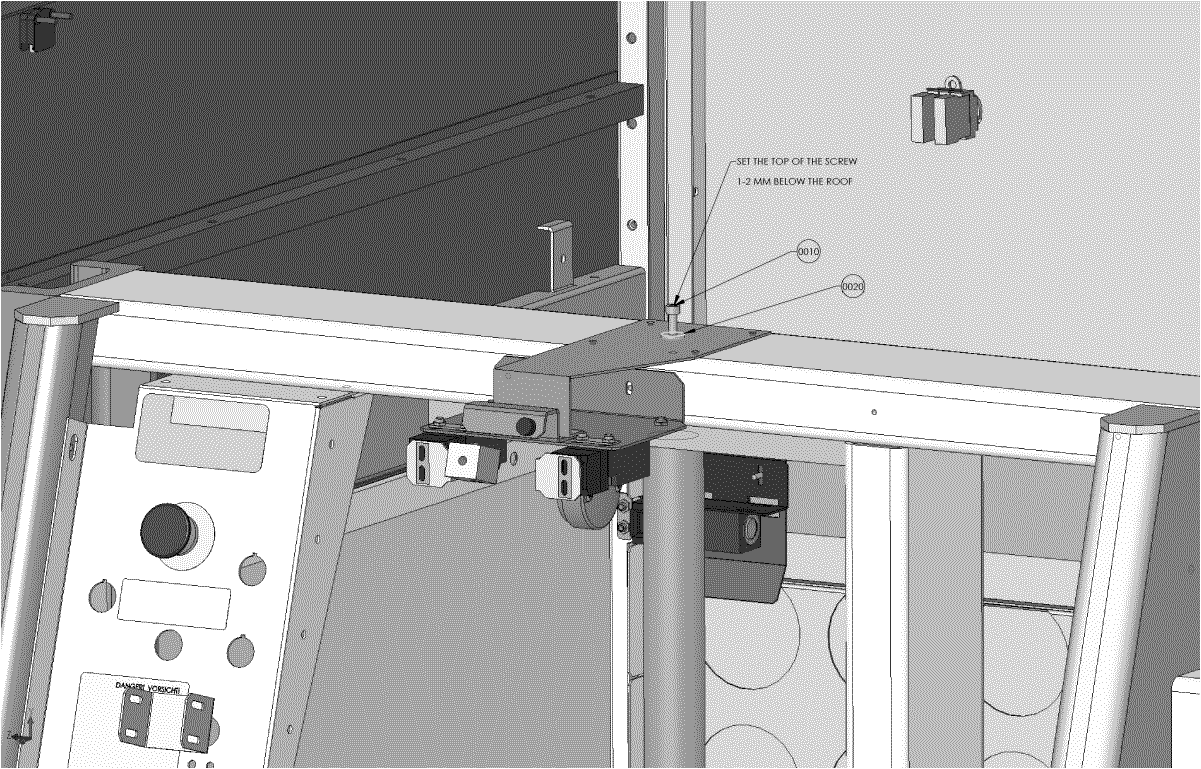
Kit: 512-00170A DWG Procedure: Add screw and washer to top of MCU jack screw assembly 500-00522A. |
| CA04683 | Drum resistive brake system changed. | 17 Aug 2004 | Next visit | Upgrade machines MT041 and before.
Kit: 512-00164A Procedure: Resistive brake assembly field upgrade procedure |
| CA04667 | Add seal to Debris Removal canister | 26 Jul 2004 | Next visit | Upgrade machines MD015 and before.
Kit: 512-00158A Procedure: FCO CA04667 |
| CA04560 | Kit for Bridge upgrade | 14 July, 2004 | Next visit | Upgrade machines MT002(Drupa), MT011(Belgium demo center), and MT013.
Upgrade kit: 512-00146A Bridge Dart Upgrade: 719-00306A |
| CA04488 | Rear auto hood moves side-to-side | 20 Jul 2004 | Next visit | Upgrade machines MT006 to MT009, MT011, and MT013. Install part number 252-06730 on the underside of the rear hood straddling the hood rib and hinge bolt.
Kit: 512-00178A Procedure: BOM |
| CA04271 | Fittings on the virtual center lock cylinder are leaking at the joint due to a plastic retaining washer. The fittings have been changed from plastic to metal. | 12 May 2004 | Next visit | Upgrade machines MT003 to MT013.
Kit: 512-00131A BOM Procedure: Replacing the fittings on the load table virtual center lock cylinder (FCO CA04271) |
| CA04204 | Load table loader binding in the wheel guide on the right side. | 19 Jul 2004 | Next visit | Upgrade machines MT001 to MT008.
Kit: 512-00127A, DWG (252-00326B) Procedure: FCO CA04204 |
| CA03751 | The front plate deflector for the unload table has been redesigned to use steel instead of aluminum, because the aluminum was getting bent and not staying down in place. Other minor changes were made to enhance performance. | 20 Apr 2004 | Next visit | Upgrade machines MT006, MT007, MT008 and MT009 (EP1-4). The front plate deflector is attached with Velcro strips, so pull the old part off and press the new one in place. |
| CA03681 | Some deflection is occurring on the front beam assembly of the load table. It has been redesigned to make it possible to adjust rail elevation and to level or replace the top panel of the beam. The beam has also been made stiffer. | 27 Apr 2004 | Next visit | Replace the front beam assembly on EP field machines. Contact Micle Zisman for upgrade priority/schedule.
Kit: 512-00115A BOM EP front beam upgrade procedure |
| FCO | Description | Release Date | Priority | Service Actions |
|---|---|---|---|---|
| CA13065 | Procedure to enable SSDrop2 to improve slip sheet handling. | 11 Oct 2007 | Next failure | Kit: 512-00459A
(see the procedure below to determine if the plate width sensor bracket must be replaced) Procedure: Procedure to Enable SSDROP2. Estimated time is 1 Hr. |
| CA12244 | Carriage ballscrew away side bearing assembly replacement. | 10 Apr 2007 | Next failure | Kit: 518-02429A
Procedure: Replacing the carriage ballscrew away side bearing assembly. Estimated installation time is 2 Hrs. |
| CA11864 | Plate angler upgrade.
The plate angler functionality improves plate registration and decreases plate bubbling and buckling with dual plate configurations that use pins 1&3 and 4&6. |
27 Mar 2007 | Next failure | This upgrade requires that CR 4.01 and patch 3 be installed. See the CR 4.01 page for details.
Kit: 512-00429A Procedure: See Plate Angler Upgrade. Estimated installation time is 2 Hrs. |
| CA11802 | Substitute plenum blower motors replacement kit | 16 Mar 2007 | Next failure | Plenum blower motors that were installed under DP #A09486 must be replaced with next failure or during the next PM.
Devices affected are MT268, MT270, MT272, MT273, MT275, and MT277.
kit: 512-00430A Procedure: Replacing a Plenum Blower Substitute Motor |
| CA11768 | SSR roller replacement | 08 Feb 2007 | Next failure | Use this kit and procedure to replace worn SSR rollers.
kit: 512-00427A for right eject devices kit: 512-00438A for left eject devices Procedure: Replacing the Slip Sheet Removal Unit Rollers |
| CA10846 | New TH3 power supply | 11 Oct 2007 | Next failure | Replace version B power supplies with the version C power supplies.
kit: 512-00439A Procedure: TH3 Power Supply Upgrade |
| CA10199 | UDRC to MDRC upgrade. | 15 Sep 2006 | Next failure | MDRC and Plate Funnel cable upgrade:
See also FCO CA12728. UDRC to MDRC mechanical upgrade for devices MT241 and earlier.
|
| CA10082 | TH2 carriage to universal carriage upgrade.
(includes Z-stage upgrade) |
02 Aug 2006 | Next failure | Upgrade machines MT184 and before with the following kits:
For Semi-Automatic devices with no Z-stage, order kit 518-01821A (contains 512-00343B, 518-00631A, and 518-01060A). For MCU/CL devices with no Z-stage, order kit 518-01822A (contains 512-00343B and 518-00631A). For SA/MCU/CL devices that already have a Z-stage, order kit 512-00343B. Procedure: Replacing a TH2 Carriage with a Universal Carriage with Z-stage. |
| CA09831 | Table center panel locking bracket changed on away side. | 05 Dec 2005 | Next failure | The away side center panel hinge lock bracket must be replaced. See the Table parts page for details. |
| CA09528 | Fan box motor replaced. | 27 Apr 2006 | Next failure | Using alternative motor supplier to replace the discontinued Dayton motor with a GE permanent lubricated motor. See the Fan Box parts page for details. |
| CA09479 | Fetcher belt tension cannot be adjusted | 10 Mar 2006 | Next failure | If the fetcher vibrates at the end of its travel and the belt tension cannot be adjusted, replace the nut slider with a revision B part.
Part: 252-01147A-B |
| CA09278 | Load table thin plate ramp kit to fix plate droop between the rails. | 22 Dec 2005 | Next Failure | May be needed on any MCU and CL device that uses 0.008 in. or 0.2 mm plates. Approximate installation time is 1 hr 20 min.
Kit: 518-01573B Procedure: Load Table Thin Plate Ramp Kit Installation |
| CA09270 | Unload table extension sagging | 03 Mar 2006 | Next failure |
Kits: 512-00348A and 512-00346A Procedures: Installing Unload Table Panel Hold Down Screws, Unload Table Extension Arm Adjustment, and Unload Table Extension Beam Change. |
| CA09020 | Power entry box upgrade. | 21 Dec 2005 | Next failure | For series 2 devices, replace the AC power filter with the new one (162-00011) after failure. For all TH3 beta devices, replace the AC filters during next visit.
Kit: 512-00333A Procedure: Power Entry Box Filter Replacement |
| CA08899 | Unload table panels replaced.
The new panels have recessed darts to prevent plates getting caught on/under the darts. |
08 Feb 2007 | Next failure | Production implementation on MT287.
Kit: 512-00402A for all panels Kit: 512-00403A for outside panels only Procedure: Unload Table Panel Upgrade |
| CA08751 | Series 2 unload table changes. | 23 Dec 2005 | Next failure | Also perform this upgrade to replace a series 1 unload table deflector.
Kit: 518-01402A Procedure: Unload Table Series 2 Upgrade |
| CA07638 | The LEC pushpin is catching on the LEC and affecting the plate loading reliability. | 04 Mar 2005 | Next failure | Replace the LEC pushpin.
Kit: 512-00301A Procedure: Replacing the LEC Pushpin |
| CA07626 | MCU motor controller has been discontinued | 22 Dec 2005 | Next failure | Replace defective motor controllers (15-3422) with the new motor controller assembly (500-03010A).
Kit: 512-00313A Procedure: Replacing the MCU Motor Controller |
| CA07311 | Registration block contacts replaced with nickel plated contacts for a more reliable electrical connection. | 29 Jun 2005 | Next failure | Upgrade machines MT090 and before.
Kit: 512-00287B Procedure: Replacing the Registration Block Contacts |
| CA06537 | SSR cover upgrade. | 16 Feb 2005 | Next failure | Kit: 512-00257A
Procedure: Rivet corner brace in place. See 
Estimated time needed: 1.5 hrs |
| CA06530 | Carriage amplifier replaced for carriage, fetcher, and ejector stepper motors.
The old carriage amp (503C01525B) has current limitation and stability problems on the Magnus devices. The new carriage amp (503-00265A) allows the device to run subsystems at higher speeds and improves the reliability and througput. |
14 Mar 2005 | Next failure | Upgrade machines MT081 and before.
Kit: 512-00259A for semi-automatic devices Kit: 512-00255A for automatic devices Procedure: Carriage Amplifier Upgrade Procedure for semi-automatic devices Procedure: Carriage Amplifier Upgrade Procedure for autoloader devices For the carriage to run reliably at higher speeds, also replace the carriage home-side ballscrew bearing. See Replacing the carriage ballscrew home side bearing assembly. |
| CA06314 | Fetcher modifications relating to wedgemaster motion.
Implement on machines that have wedgemaster up/down errors. |
02 Feb 2005 | Next failure | Implement on machines MT069 and before.
Kit: 512-00225A Procedure: Wedgemaster cylinder block and up sensor upgrade |
| CA05944 | FRU replacement part for picker pusher. | 09 Dec 2004 | Next failure | Implemented on approximately MT070 and later.
FRU: 500-02468A Procedure: If the picker tab does not fit into the slot on the older picker pusher (252-03535B), then the picker pusher should be replaced with the FRU part 500-02468A. Assembly drawing: 500-02468A DWG |
| CA05641 | Changes to ejector track retainer and bearing assembly to solve sticky ejector issues.
The nylon retainer was used to compress the bearing, but the retainer material did not hold its dimensions. The modified design removes the nylon part from compressing the bearing. |
28 Oct 2004 | Next failure | Upgrade machines MT069 and before.
Kit: 512-00214A Procedure: Ejector track upgrade
Assembly drawings: 512-00214A DWG and 500-00348A DWG. |
| CA05590 | The CIL drum drive amplifier is replaced with the Automotion amplifier board. | 04 Mar 2005 | Next failure | Upgrade machines MT084 and before.
Kit: 512-00253B Procedure: Replacing the drum drive |
| CA05586 | Pressure switch unreliable. | 23 Dec 2004 | Next failure | Upgrade machines MT073 and before.
Use kit 510-00048A to replace pressure switch 172-00045. See also the Chiller Troubleshooting Guide. |
| CA05253 | Fix burrs on the cassette locator rails. | 02 Sep 2004 | Next failure | Upgrade machines MT024 and before.
Kit: 512-00198A. Procedure: If burrs exist on the inside of the cassette locator guide rail (usually at the T-shaped strain relief slots) and cause the plate to bind and fall off the p-cups, it is necessary to remove them. The kit contains sandpaper for the removal of the burrs. |
| CA05234 | Picker and fetcher not engaging properly. | 08 Apr 2005 | Next failure | Upgrade machines MT001 to MT083 as required.
Kit: 512-00196A Procedure: Picker/Fetcher reliability upgrade |
| CA05127 | If MCU cassettes are catching on the plenum rollers and are difficult to load into the MCU, this kit should be installed. | 01 Sep 2004 | Next failure | Replace the old cassette plenum rail (252-01637A) with the new one (252-01637B). Upgrade MCUs MM019 and before.
Kit: 512-00189A. Procedure: Replacing the cassette plenum rail |
| CA05109 | Picker Pcups lift capacity does not have enough margin to lift all plates. | 10 Sep 2004 | Next failure | Upgrade machines MT030 and before.
Kit: 512-00190A Procedure: P-cup and swivel assembly upgrade |
| CA05091 | Plate to fetcher handoff fails. | 02 Sep 2004 | Next failure | Upgrade machines MT027 and before (MT025 and MT006 already done).
Kit: 512-00194A. Procedure: Picker/fetcher handoff tab installation Assembly drawing: 500-00474A DWG |
| CA04994 | The round mounting holes in the fetcher CN roller guide (part of SSR) overcontrain the part. | 12 Aug 2004 | Next failure | Mirror parts 252-02879A-B and 252-02880A-B are overcontrained by the round holes in the assembly and may cause fetcher
alignment problems or interference with the fetcher SSR wings. Implemented on approximately MT040 and later.
Replace these parts with rev. C or later if they are causing problems. |
| CA04976 | MCU panels sag under load. Support brackets added to stiffen panels. | 02 Sep 2004 | Next failure | Upgrade machines MT033 and before as required.
Kit: 512-00195A. Procedure: MCU panel upgrade |
| CA04934 | The rear bridge cover is not supported well and tends to sag causing interference with the ejector. This eco adds two brackets to stiffen the panel. | 10 Sep 2004 | Next failure | Affected machines: MT031 and before (with the exception of MT026)
Kit: 512-00203A Procedure: Rear bridge panel support upgrade |
| CA04926 | Balancer assembly partial redesign. | 18 Nov 2004 | ASAP | Upgrade machines MT091 and before and MT093.
Kit: 512-00216B Procedure: Drum Balancer Upgrade Estimated time to complete - 8 hrs.
Tool kit: 514-00095A |
| CA04890 | New hold-down washers for registration pin wire routing. | 12 Aug 2004 | Next failure | Affected machines: MT032 and before (with the exception of MT025)
Kit: 512-00187A Procedure: Replace the old insulating washers if they are interfering with plate loading. |
| CA04733 | PEB change - adding debris unit fuse.
Due to random tripping of the debris unit circuit breaker, the circuit breaker is replaced with a fuse. |
10 Sep 2004 | Next failure | Affected machines: MT023 and before.
Kit: 512-00172A Procedure: FCO CA04733 |
| CA04701 | New backbone parts required for adjusting the LEC openings. | 04 Aug 2004 | Next failure | Upgrade machines MT032 and before with the exception of MT021/26/28/29/30/31.
Kit: 512-00185B Procedure: See FCO CA05122 |
| CA04600 | Plate stop actuator guide bearings are binding due to incorrect spacer sizing. | 21 Jul 2004 | >Next failure | Applies to machines MT016 and before (machines shipped before 07 Jun, 2004).
If the bearings are binding, replace the bearing and the washers on either side of the bearing from kit 512-00147A. A temporary solution is to loosen the screw that holds the bearing in place to releive the pressure on the bearing shields and allow the bearing to rotate. |
| CA04561 | Remove ejector home/away sensors. | 12 Aug 2004 | Next failure | Applies to machines MT003 to approximately MT032.
Procedure:
|
| CA04449 | Reliability changes:
252-00303A (outer loader beam) needs holes added for cable ties. 252-00351A (top frame pullout support) needs holes added for cable ties for stat button cable. 500-00108A (virtual ctrl&wiffle loader), cable tie added to ensure cable is held in safe area and allowed to flex for wiffle movement. |
21 Jul 2004 | Next failure | Applies to machines MT003 to approximately MT024.
If cables fail in the field, then the holes and cable tie should be added to improve future reliability. See BOM for details and instructions. |
| CA04247 | The plastic cones that the load table rails fit onto have been deforming, preventing the rails from being installed. The material for the cones is being changed from delrin to metal. | 18 May 2004 | Next failure | Only applies to machines MT003 to MT016.
Kit: 512-00130A BOM Cone alignment jig: 690-00271A DWG Procedure: Load table guide rail cone replacement (ECO CA04247) |
| CA04095 | Ejector fingers interfere when they actuate due to tolerance stack ups and small clearances. The fingers are also quite thin and flimsy. They have been re-designed to be thicker and the clearances between the plate stops and finger boards have been increased to avoid tolerance stack up problems. | 30 Apr 2004 | Next failure | Replace ejector assembly with new one.
Kit: 518-00281A |
| FCO | Description | Release Date | Priority | Service Actions |
|---|---|---|---|---|
| CA14588 | Picker gantry hard stop upgrade | 18 Feb 2008 | Next PM | Install on APLs MP0013 and before.
Kit: 512-00499A Procedure: Picker Gantry Hard Stop Upgrade |
| CA10899 | Bridge latch upgrade. | 21 Nov 2006 | Next PM | This upgrade fixes a flaw in the Magnus VLF bridge where the safety loop can be
inadvertently disconnected when someone leans on the front bridge panel. The problem is
solved by adding a mechanical latch to the top panel. Upgrade machines MT249 and before.
Kit: 512-00398A (right eject devices) OR Kit: 512-00399A (left eject devices) Procedure: Bridge Latch Upgrade Procedure |
| CA05568 | Cable wires changed to Hi-flex type. The unload table cable needs to flex and Hi-flex wires are used to improve reliability. | 05 Nov 2004 | Next PM | Replace cable with new one during next PM visit. Upgrade machines MT069 and before.
Kit: 512-00210A (canbus GENINE 1 cable 220-00171B) Procedure: CANBUS cable uprade |
| CA04440 | Changes to virtual center bar loading assembly to prevent binding. | 21 Jun 2005 | Next PM | Replace the virtual center bar loading assemblies with three new ones (500-00107B) during next PM visit.
Kit: 512-00311B Procedure: See Replacing the Virtual Center Bar Loading Assemblies |
| CA04190 | The latch assembly is loose on the lower center access panel (500-00553A, automatic machines ony). A new latch assembly has been designed. | 07 May 2004 | Next PM | Upgrade field machines before MT016 with the new latch assembly.
Parts:
Contact Micle Zisman for priority and procedure. |
 To determine which drum amplifier is currently installed, in Service Shell type >>set drum drvdir. CIL amp: >>set drum drvdir – 0 ; Automotion amp: >>set drum drvdir – 1