Home | Contact Us | Submit Troubleshooting Info | Search | Help


    Output | Software Solutions | Proofing | Color, Screening and Calibration | Scanning | Digital Photography | Consumables | POS


Preventive maintenance procedures for the Magnus 800

Important: Strictly confidential. Do not leave this document at a customer site.
Preventive maintenance (PM) must only be performed by Creo service personnel
or by trained and certified operators.


To print out the preventive maintenance instructions below, click on the print icon at the top of the page.

Note:

PM and jigs part lists:

Before going to the site:

Important:
During the PM procedures, do not dismantle any part which has not been specified for checking, cleaning or greasing.

Imaging

Recommendation:  To properly assess image quality, the processor chemistry should have been serviced and filled with fresh chemicals within the previous 24 to 48 hours.

Expose a Creo Plate Test Target (CPTT) in the client’s favorite format. This will serve as your reference plate.

Imaging

Do the following...

Reference

Imaging quality Inspect the exposed CPTT reference file.


Laser Check the laser graph and power as described in the Thermal 2: Planned Maintenance Procedure.
Compare the results with the results of the last PM.
Thermal 2: Planned Maintenance Procedure
   

Safety and Exterior

Objectives:  Check safety first!  Determine that all Magnus 800 components are safe to operate and to work on. Walk around the entire device to examine the exterior and surroundings for damage and any issues that may require further investigation or repair.

Safety and Exterior Evaluation

Do the following...

Reference

Site conditions Verify that the site conditions, including humidity and temperature, are within the specifications.
Record the humidity and temperature readings on the PM report, and inform the operator if any of the conditions fail to fall within the following ranges:
  • 20°C - 30°C (68°F to 86°F)
  • 40% - 60% relative humidity (non condensing)
  • Staccato 10 maximum temperature variation allowed: ±2.5/C
 
Doors,
panels, and interlocks
  1. Visually inspect the overall condition of all surfaces.
  2. Open each door and panel.
  3. In Magnus Controller, check safety interlocks and verify that they function correctly.
Need to link to safety guide
Debris cabinet hose Verify that the exterior hose is not impeded or broken.
 
Cooling fluid leaks
  1. Check the floor at the side of the platesetter and verify that there are no external fluid leaks.
  2. Check the fluid level. Add fluid if required.


Backup Settings

Objectives:  Determine that Magnus 800 is operating correctly. Note any irregularities for further investigation.

System Operation

Do the following...

Reference

Backup settings Back up all the parameters that are regularly stored on the workstation - by the Controller or Service Shell, and on the device iteslf by firmware such as the MCE and thermal head.
Firmware upgrade If required, update to the current controlled release version as described in the section Downloading Firmware in the Service Shell online help.
   

Assemblies and Components

Objectives:  Check everything, then go back and repair or adjust as required.
Important:  Before opening any doors and panels.

Load and unload at least three plates of different sizes. Verify that the loading and unloading sequences progress successfully.
Successful loading and unloading verifies that the lead/trailing edge clamps (LEC/TEC) and drum balance systems are working properly.

Magnus 800 output devices (platesetter, autoloader, MCU)

Assemblies and components

Do the following...

Reference

FCOs
  1. Check that all next visit FCOs are implemented on the platesetter.
  2. Install FCO Updater utility for existing FCOs, as required. (Itai to check with Yaron regarding the tool we will have.)
Link to future FCO page.
Board diagnostics Run diagnostics on the boards. Link to be defined
Overall system Check for rust and paint damage every six months.  


Magnus 800 platesetter

Air and ventilation Do the following... Reference
Air supply unit

Drain the liquid from the air supply unit:

  1. Inspect the air filter window to make sure that the filter does not contain any water or oil.
    Note: Only applicable to the two air filter units closest to the air gauge (LFMPA AND LFMPX).
  2. To drain any water or oil that exists in the air filter units, rotate the blue switch, located at the bottom of each filter unit, in a clockwise direction.
Air pressure filters

Replace the three air pressure filters.

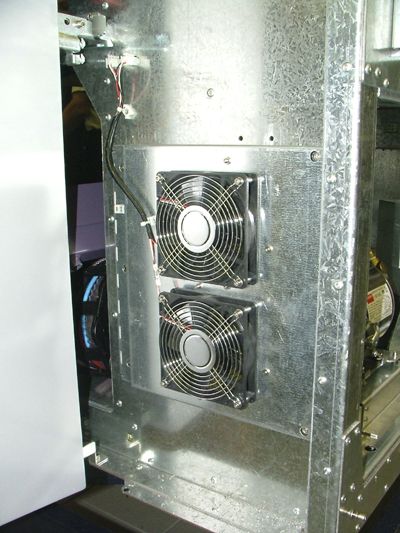
Fans and ventilator openings

Use a damp cloth to clean the following fans and ventilator openings:


Optomech

Do the following...

Reference

Punch slugs

Clean punch slugs in both platesetter and slug box.
Consider more frequent cleaning, if dealing with a very high volume customer.

Procedure
Note: Procedure not finalized

Punch detectors
  1. Verify proper performance of the punch home position detectors, and tighten the screws if necessary.
  2. Clean the detectors with rice paper and alcohol.
 
Carriage rails Inspect the lubrication on the carriage rails.
Lead screw

Make sure the lead screw has sufficient grease:

  1. In Magnus Controller, click Raise Platform to raise the loading platform:
  2. Manually raise the unloading platform.
  3. Inspect the carriage rails. Make sure they rails are sufficiently lubricated with Microlube GL 261 (part number 89-0007)
    (Note: Part number liable to change)
  4. Manually lower the loading platform.
 
Drum vacuum holes Clean the drum vacuum holes.
Drum surface Clean the drum surface.
Drum roller

Clean the drum roller:

  1. Remove the punch slug bin.
  2. Dampen a clean cloth in water.
    Important: Never clean the drum roller with an alcohol based cleaner.
  3. Wipe the cloth along the length of the drum roller.
  4. Make sure there is no residue left on the drum roller.
  5. Reinstall the punch slug bin.

 
Edge detection strip

Clean the edge detection strip:

  1. In Magnus Controller, click Raise Platform to raise the loading platform.
  2. Remove the front upper panel.
  3. Manually rotate the drum until the edge detection strip is visible.
  4. Dampen a clean, dry cloth in 70% cleaning alcohol.
  5. Use the cloth to systematically, clean the edge detection strip.
  6. Make sure the surface is debris and dirt free.
  7. Manually close the loading platform.
  8. Reinstall the upper front panel.
TH2 window Clean the thermal head II (TH2) window.
UDRC filter Replace the UDRC filter.
Cooling unit filter Replace the filter.


Loading Platform

Do the following...

Reference

Plate holders

Clean the plate holders:

  1. In Magnus Controller, click Raise Platform to raise the loading platform.
  2. Dampen a clean, dry cloth in 70% cleaning alcohol.
  3. Use the cloth to clean every plate holder punch slot, located on the punch bar.

Loading platform optical sensors

There are two optical sensors on the loading platform:

  • Loading platform left front optical sensor
  • Loading platform right front optical sensor
  1. Use a dry, clean cloth to remove any dust, debris and finger prints from the sensors’ eye.
  2. In Magnus Controller, locate the relevant optical sensor dialog boxes.
  3. Cover each sensor and make sure their status changes in the relevant dialog box.
  4. If required, replace any faulty sensors.
Loading platform rollers
  1. Dampen a clean cloth in water.
    Important: Never clean the drum roller with an alcohol based cleaner.
  2. Wipe the cloth along the length of the rollers.
  3. Make sure there is no residue left on the rollers.


Loading platform belts

There are five belts on the loading platform.

  • Make sure the belts are in good working condition.
  • Make sure the belts are not torn or frayed.
  • Make sure the belts are not loose.

If required, replace any damaged belts.

Loading platform

Clean the loading platform:

  1. In Magnus Controller, click Raise Hood to raise the hood.
  2. Dampen a clean cloth in water.

    Important: Never clean the loading platform with an alcohol based cleaner.

  3. Wipe the cloth along the length of the loading platform.
  4. Close the hood.
Alignment system detectors There are four strategically positioned home and away detectors on the alignment system:
  • Fixed registration pin home detector
  • Fixed registration pin away detector
  • Spring registration pin home detector
  • Spring registration pin away detector
  1. Make sure the detectors are functioning correctly:
    • In Magnus Controller, locate the relevant detectors’ dialog boxes.
    • Cover each detector and make sure their status changes in the relevant dialog box.
  2. If required, replace any faulty detectors.
Alignment system optical sensors

There are two optical sensors on the alignment system. Each sensor is located near to the alignment system pins.

  1. Use a dry, clean cloth to remove any dust, debris and finger prints from the sensors’ eye.
  2. In Magnus Controller, locate the relevant optical sensor dialog boxes.
  3. Cover each sensor and make sure their status changes in the relevant dialog box.
  4. If required, replace any faulty sensors.


Unloading Platform

Do the following...

Reference

Unloading platform exit rollers
  1. Dampen a clean cloth in water.
    Important: Never clean the rollers with an alcohol based cleaner.
  2. Wipe the cloth along the length of the rollers.

Procedure

Unloading platform optical sensor

There is one optical sensor on the unloading platform. (Located at the rear edge of the unloading platform.)
  1. Use a dry, clean cloth to remove any dust, debris and finger prints from the sensors’ eye.
  2. In Magnus Controller, locate the relevant optical sensor dialog boxes.
  3. Cover each sensor and make sure their status changes in the relevant dialog box.
  4. If required, replace any faulty sensors.

Unloading platform belts

There are nine belts on the unloading platform.

  • Make sure the belts are in good working condition.
  • Make sure the belts are not torn or frayed.
  • Make sure the belts are not loose.

If required, replace any damaged belts.

Procedure


Magnus 800 autoloader

Component

Do the following...

Reference

Autoloader exit rollers
  1. Dampen a clean cloth in water.
    Important: Never clean the rollers with an alcohol based cleaner.
  2. Wipe the cloth along the length of the rollers.


Paper picker rollers
  1. Dampen a clean cloth in water.
    Important: Never clean the rollers with an alcohol based cleaner.
  2. Wipe the cloth along the length of the rollers.
Suction cups Replace the suction cups at least every six months. Platesetters that expose a large amount of plates may need their suction cups replacing more frequently.
Loading conveyor

Clean the surface of the loading conveyor:

  1. Manually raise the loading conveyor cover.
  2. Dampen a clean cloth in water.
    Important: Never clean the loading conveyor with an alcohol based cleaner.
  3. Wipe the cloth along the length of the loading conveyor.
  4. Close the loading conveyor cover.
Loading conveyor belts
  • Make sure the belts are in good working condition.
  • Make sure the belts are not torn or frayed.
  • Make sure the belts are not loose.

If required, replace any damaged belts.

 
Paper exit tray optical sensor
  1. Use a dry, clean cloth to remove any dust, debris and finger prints from the sensor’s eye.
  2. In Magnus Controller, locate the relevant optical sensor dialog box.
  3. Cover the sensor and make sure its status changes in the relevant dialog box.
  4. If required, replace the sensor.
Paper picker up/down detectors
  1. In Magnus Controller, locate the paper picker up/down detector dialog boxes.
  2. Locate the paper picker arm and open its dialog box.
  3. Activate the arm (up and down).
  4. In Magnus Controller, make sure the detectors’ status changes.
 
Fans and ventilator openings Use a damp cloth to clean the following the autoloader MSB and fan.


MCU for Magnus 800

Component

Do the following...

Reference

Side-to-side optical sensor
  1. Use a dry, clean cloth to remove any dust, debris and finger prints from the sensor’s eye.
  2. In Magnus Controller, locate the relevant optical sensor dialog box.
  3. Cover the sensor and make sure its status changes in the relevant dialog box.
  4. If required, replace the sensor.
Need image
Cassettes

Clean inside the cassettes:

  1. Release a cassette from the MCU.
  2. Verify that there are no plates inside the cassette. If there are, remove them.
  3. Dampen a clean, dry cloth in 70% cleaning alcohol.
  4. Use the cloth to clean the inside of the cassette.
  5. Make sure to clean in between the plate guides and tracks.
  6. Reinsert the cassette.
  7. Repeat for each cassette.
Need image


Service Comments

  1. Record PM call information.
  2. Perform fine machine calibration after PM:
    1. Perform a minimum of two loading sequences with different plate sizes and thickness. Adjust the parameters, if required.
    2. Perform the following Magnus 800 calibrations (if necessary):
      • FOC offset (Focus)
      • Laser power
      • SR
      • Edge SR
      • Slope
      • Curve
    3. Expose the final CPTT; check and obtain approval for machine calibration quality.
    4. Back up the registry and the database to a floppy disk, using BART.
  3. Complete the Service Comments section of the Preventive Maintenance Checklist.
    For the customer’s information, make a note of the following:
    • All FCOs that were installed.
    • All firmware updates that were installed.
    • Any safety features that were disabled or bypassed.
    • Any operating environment issues, such as room temperature, humidity, etc.

Customer Acceptance

To complete the PM, the customer checklist must be signed by the customer and returned to Creo.


    Copyright © 2005 Creo Inc. All rights reserved. Confidential. Back to top.